![]()
![]()
![]()
![]()
![]()
|
| Please Support our Sponsors |
 |
 |
||
 |
|
Build Article
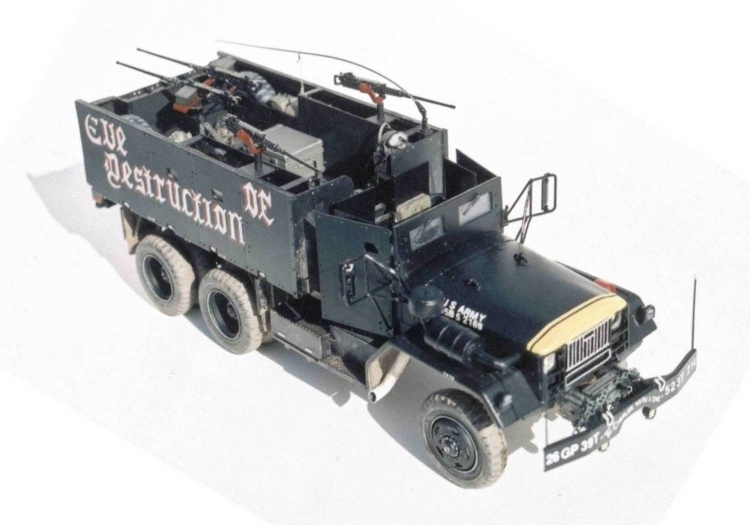
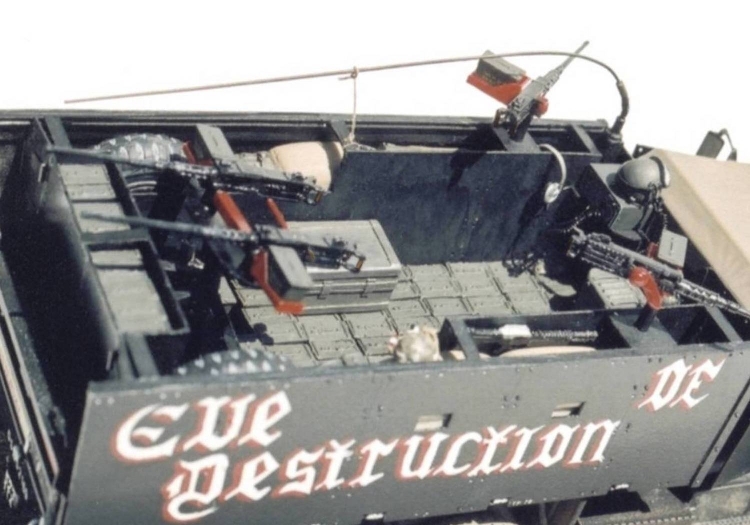
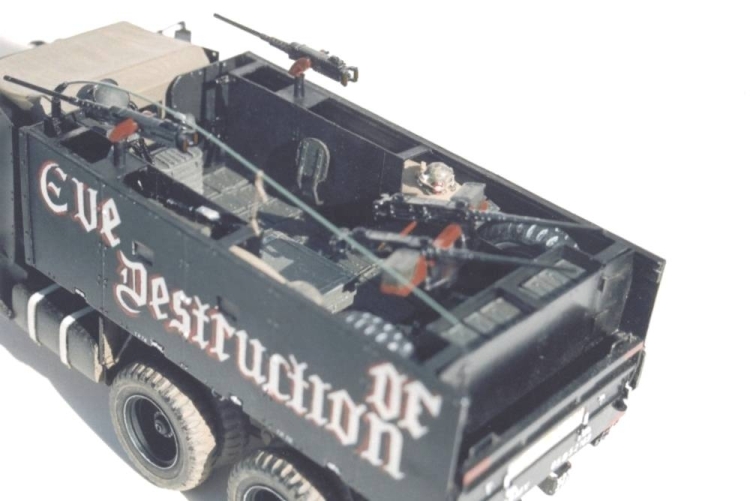
1/35 M-54 Vietnam Era 5-Ton Gun Truck
"EVE OF DESTRUCTION"
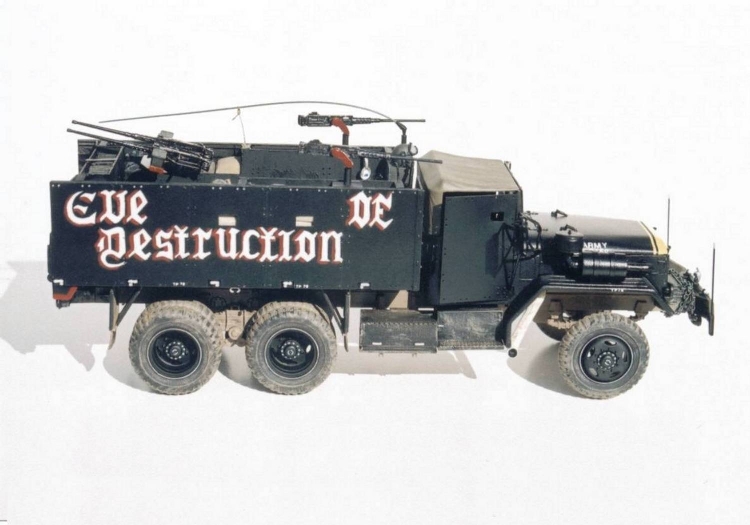
By James Lyles - Florida USA
|
Photos
|
|
M54 5-Ton Truck Conversion I used two different kits for the basis of this model. The 1/35 AFV M35A2 was used because a 2-1/2 ton and 5-ton use the same cab, as well as some other parts. I also used the Italeri 1/35 M-925 kit because the frame, suspension and bed are basically the same as an M54A2C Vietnam era drop-side 5-ton cargo truck. I first started with an AFV M35A2 hood/cowl. I cut the front of the hood off and added a 15/32" piece of plastic between the two pieces. I then reshaped the front of the hood using filler putty, getting rid of the three angled M35 shape to the straight across M54 shape. I then contoured the scallops into the hood, added two lift handles and the two small bolts to the front which held the hood release handle. I then made a silicone rubber mold of the new hood and cowl and cast them in resin as one solid piece. The AFV M35A2 grille was modified from the three angled look to the straight across look of the 5-ton by cutting off the two outside angled portions of the grille and gluing them on straight. I then cut a small access into the top of the two center vertical grill bars and added a horizontal piece for the hood release access. I made a mold of the new 5-ton grille in silicone rubber and cast this new grille in resin as a solid piece. Small brackets are added for the hood clamps. Hood clamps were molded and cast from the M35A2 kit and glued to the windshield brackets and hood handles. The side panels from the AFV M35A2 were modified by adding 15/32" to their length. The passenger side panel air cleaner hole was filled and another hole was drilled near the front of the panel for the 5-ton turbo canister tube. The side panels were then molded and cast in resin as solid pieces. The fenders from the AFV M35A2 were modified first by cutting the fenders away from the center section. The two strengthening ribs were sanded off the tops of each fender and each fender was lengthened 15/32" and widened 1/8". Lengths of half-round plastic rod were cut to equal lengths and tapered on the ends to simulate fender strengthening ribs and three were added to the tops of each fender. I then molded and cast the individual fenders in resin. A new longer center section was made from .040" sheet plastic and glued between the two fenders. I also molded and cast the AFV M35A2 cab floor, cab rear, doors, running board storage boxes, dashboard, radiator, seats and canvas top to keep from having to buy another M35A2 kit each time I wanted to make a 5-ton. The clutch and brake pedals and other floor mounted shifters were scratch built. The cast running board storage and battery boxes are glued to the frame using pieces of sheet plastic as shims to get the desired alignment with the front fenders. In addition, the entire turbo canister and pre-cleaner were made from scratch using various plastic tubes, rods and strips of plastic sheeting, then cast as solid pieces. The Italeri M-925 modern era 5-ton, kit number 284 was chosen since the frame, suspension and bed are very similar to the Vietnam era M54. The frame was shortened by 1/8" near the center in order to make the cab's rear sit at the proper distance from the bed's front. One of the drive shafts had to be shortened by the same margin. The M-925 bed sides were modified in the following manner: All extra items inside the five sections of each bed side, bed front and tailgate were removed; The two small running lights under each side were also removed; The two C-shaped tie downs under the bed edge were carefully removed and saved for further use; Very thin plastic pieces were cut to exact size and glued inside each bed-side section; The tie downs and reflectors from the AFV M35A2 kit were molded and cast, then glued in the sections in the appropriate places; and each bed-side was them cast as solid pieces. The two C-shaped tie-down hooks which were removed from beneath each bed side can now be used. Only one was glued to the center of each side just as an M54 has. Although there were a few Vietnam era 5-tons using the NATO style turn signal assemblies. I went with the old style light assemblies and removed the molded in lights from the rear valance panel below the tailgate and filled it in. I molded and cast the old style lights, reflectors and b/o light from an M-113 APC kit. I glued them in place under the rear valance panel using brackets I scratch built as original from .020" plastic sheeting. I used the windshield frame from the M-925 kit by narrowing it. I cut a section from the center of each window frame and glued it back together. I removed the stock windshield wipers so that they could be used later on the armored windshield plate. I molded and cast the two windshield clamps from the M35A2 kit and glued them to the hood posts. The stock front axle from the M-925 seems to be too narrow and if left unchanged, the model tends to resemble a Model-T. I cut the axle housing in half outside each spring perch and glued in a 1/8" piece of plastic and sanded it smooth for a total widening of 1/4". Since the steering link had to be lengthened 1/4" also, I replaced the entire bar between the two link ends with a piece of plastic rod. The fuel tank from the M-925 kit was used but modified in the following manner. The 925's U-shaped tank straps on the top and front were sanded off and replaced with .010" plastic strips. Two locating pegs for a step plate on top of the tank were also removed. A fuel line was added for realism and an indentation in the shape of a cross was added to the front of the fuel tank. Gun Truck Conversion Now that I had the basic M54 (drop-side) 5-ton, I could start converting it to a Vietnam era gun truck called EVE OF DESTRUCTION. I wanted to model an actual Vietnam gun truck and make it look as authentic as possible. This particular black gun truck sits in the U.S. Army Transportation museum in Fort Eustis, Virginia and is the only surviving gun truck brought back from Vietnam in the early 70s. The wooden bed floor was covered by gluing in a piece of .005" sheet plastic. I cut the windshield armor, bedside armor and door armor out of .020" sheet plastic. I scribed separation lines in the bedside armor to give the appearance of individual armored panels. I drilled the appropriate holes in the armor by hand, then inserted and glued in small pieces of plastic rod to simulate bolt heads and cut the gun ports by hand. I did the same thing with the inner bed armor, making everything out of .020" sheet plastic, plastic rod, plastic angle, etc. The outside armored doors were glued in place using a wedge shaped piece of plastic to hold them out at the correct angle. The windshield armor had to have internal vision blocks set in channeling. The channeling was made from U-shaped plastic pieces and the glass was cut from clear plastic stock which had been masked and sprayed with a light mist of satin clear to make them look like the wipers had wiped them. I drilled holes for the new wiper arms, then cut down the wiper blades to size and glued the wipers in place. The weapons mounts were scratch built from Evergreen plastic sheeting, rods and tubes copying the original mounts exactly. I cast over a hundred individual .50 cal ammo boxes and glued them to the gun truck floor and inside the double walled armor. Both mirrors have chromed Mylar surfaces glued to them to simulate real mirrors. The radio's coiled wiring was made from small diameter single copper wiring strands which were wrapped around a pin and bent to shape. The headphones were scratch built, as was the small spot light and the equipment box in the bed. The exhaust pipe was made from three pieces of plastic sprue and the end drilled and tapered. The saluting hand on the front bumper was made using two different hands cut and molded together. The original hand was only on Eve of Destruction for a short time before the brass made them remove it but I thought it added a nice touch. The .020" front bumper guides were inserted into drilled holes in the bumper and glued. The gas can bracket on the running board is scratch built and a folded plastic strap was added for realism. The siren was also entirely scratch built as the original. The tow chain was made from some old costume jewelry I found at a flea market for .50 cents but I scratch made the chain's connections and tow hook. Markings The lettering on the side was made by covering the side with masking tape, then hand drawing the lettering onto the tape. I then cut out the lettering using a razor knife and painted several light coats of semi gloss white. I highlighted the lettering in red using a very small brush. The bumper and hood letters are dry transfers.
|
| Copyright: James Lyles - October 1, 2007 |